I’m going to show you how you can build in-app notifications for your model-driven apps without needing to know or write any code using XrmToolBox!
Enabling in-app notifications for your chosen app
You’re going to need to have XrmToolBox installed prior to being able to do this with the In-App Notification Builder tool also installed within XrmToolBox.
Once you’ve connected to your environment and you’ve opened the tool, we’ll be able to do a few things. First you can select the app you’re intending to work with using the dropdown next to ‘App’ at the top of the page.

We can now see that for the app I’ve selected there is a red circle with a square in it next to ‘notification status’ showing me that I haven’t enabled in-app notifications for this app yet. By clicking that red button you’ll be able to enable in-app notifications for the app you wish to enable them for. Now we can get to work building nice looking in-app notifications that we can use for the apps we’ve just enabled the functionality for 🙂
Building our notification – Design & Body
Now for the fun easy part! We can now start to build a notification that we can then use in our model-driven app! Starting with the top part of the form which is the ‘data’ part, there’s a number of things we can change here for the information on our card before we get to any buttons/actions we want to add. We can give our card a title to start with and then add some body text which will appear under the title. You can even add hyperlinked text into the body and add images if you wish.
Then you can set the toast type which determines whether the notification will pop up when it’s notified or whether it will simply remain hidden in the notifications pane for the next time a user clicks the notification bell.
Then we can determine when the notification will expire itself without us clicking the ‘X’ on it. Finally, you can choose the icon you wish to add to your notification card.
No icon for your design?
If you can’t pick an icon which matches the design you want to achieve, don’t worry! You can upload a web resource into Dataverse with an icon you prefer, then you can choose the icon here! Simply ensure it’s uploaded and published in your environment, then set the icon dropdown to ‘custom’ and set the image to the web resource you wish to use!
Adding actions
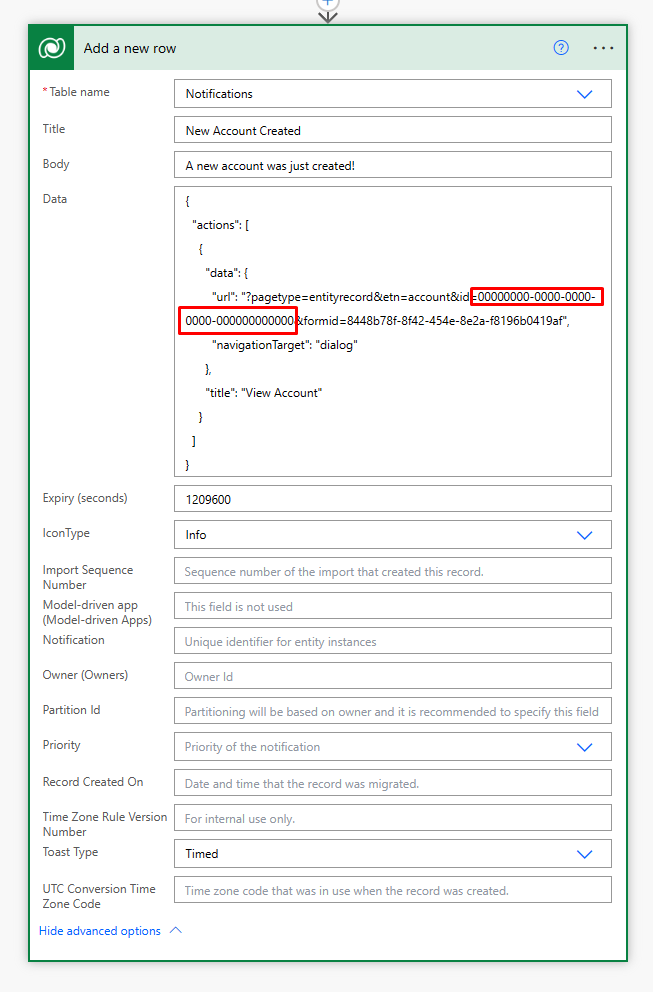
To add actions simply click ‘add’ under actions further down the screen. Then you can use the dialogue to build out an action you wish to add into your notification. If you’re using things like a button to open a record, and you’re wondering how on earth your app will know which record you want the button to point to… fear not! We’re going to export the code for this and pop it into a step in a Power Automate flow where we’ll replace the hard coded record GUID with some dynamic content that makes more sense.

Building our flow
The next thing we need to do is build the flow that will create the notification in our model-driven app. Effectively to make a notification appear in a model-driven app we have to create a record in the Notifications table in dataverse. Before going to your flow, click the dropdown next to ‘get code’ in XrmToolBox and click Power Automate. This will produce a dialogue window with all of the content we’ll need to paste into our cloud flow step to create our notification record.
In your cloud flow add an action ‘add a new row’. Then choose the notifications table. Copy all of the content from XrmToolBox into your flow step.

Then simply run your flow and watch the magic happen in your model driven app!
I hope you found this post helpful. If you have any questions on this topic, let me know in the comments below 🙂

